



How to Make a Fibreglass Mould: A Complete Step-by-Step Guide

Introduction

If you’re looking to learn how to make a fibreglass mould, you’re in the right place. Whether you’re producing a one-off component, creating prototype parts, or setting up for larger-scale composite manufacturing, a well-made mould is essential for achieving high-quality results.

In this guide, we’ll walk you through the entire fibreglass mould-making process, including preparation, gelcoat application, reinforcement, curing, and finishing. You’ll also learn the most common mistakes to avoid and how to extend the lifespan of your mould.

Contents

  • What Is a Fibreglass Mould?
  • Materials and Equipment Required
  • Step 1: Create and Prepare the Plug
  • Step 2: Apply Mould Release Wax
  • Step 3: Apply Gelcoat
  • Step 4: Lay Up the Fibreglass
  • Step 5: Reinforce the Mould
  • Step 6: Cure and Demould
  • Step 7: Finish and Prepare for Production
  • Common Fibreglass Mould-Making Mistakes
  • Frequently Asked Questions
  • Related Products and Resources


What Is a Fibreglass Mould?

A fibreglass mould is a durable form used to manufacture composite parts with consistent dimensions and surface finishes. The mould acts as the negative shape of the final product and can be used repeatedly for production runs.

Fibreglass moulds are commonly used in:

  • Marine manufacturing
  • Automotive components
  • Building and construction
  • Water treatment equipment
  • Aerospace applications
  • Industrial fabrication

Materials and Equipment Required

Before you begin, you’ll need:

Materials

  • Mould release wax
  • Release agent
  • Tooling gelcoat
  • Polyester resin
  • Catalyst (MEKP)
  • Chopped strand mat (CSM)
  • Fibreglass reinforcement
  • Acetone
  • Body filler or plasticine


Equipment

  • Paddle rollers
  • Brushes
  • Mixing containers
  • Sandpaper
  • PPE
  • Respirator mask
  • Safety glasses
  • Gloves

Related Products: Link to:

  • Wax & Mould Release Products
  • Polyester Resins
  • Chopped Strand Mat
  • Gelcoats

Safety First

Always work in a well-ventilated environment and follow the manufacturer’s Technical Data Sheets (TDS) and Material Safety Data Sheets (MSDS).

Wear:

  • Protective gloves
  • Safety glasses
  • Respiratory protection
  • Protective clothing

Step 1: Create and Prepare the Plug

The plug forms the basis of your mould and ultimately determines the quality of the finished component.

Preparation Checklist

Round sharp corners (minimum 10mm radius)

Repair cracks and imperfections

Sand the surface with 1000-grit wet-and-dry paper

Clean thoroughly using acetone

Polish the surface

Apply 4-5 coats of mould release wax

Pro Tip

Every imperfection in the plug will transfer directly into your mould and eventually into every part you manufacture.

Step 2: Apply Mould Release Wax

A reliable mould release system makes demoulding easier and helps prevent costly damage.

Best Practice

  • Apply multiple thin coats
  • Allow each coat to haze before buffing
  • Ensure complete coverage of edges and corners


Recommended Products: Link internally to mould release products category.

Step 3: Apply Gelcoat

Tooling gelcoat provides the mould’s surface finish and durability.

Mixing Ratio

2% catalyst

Application Rate

Approximately 500g/m²

Recommended Coverage

Mould / Low Volume
Gelcoat Layers
Prototype/Low Volume
1 Coat
Production Mould
3 Coats

Using contrasting gelcoat colours between coats can make future sanding and repairs easier.

Step 4: Lay Up the Fibreglass

Once the gelcoat reaches a tacky state, begin laminating.

Process

  • Apply catalysed resin.
  • Position chopped strand mat.
  • Fully wet out the reinforcement.
  • Use a paddle roller to remove trapped air.
  • Repeat until desired thickness is achieved.


Resin-to-Glass Ratio

A good rule of thumb is:

Resin weight = 2.25× glass weight

Example:

  • 450g CSM
  • Approximately 1kg resin per m²

Recommended Thickness

Most moulds require:

  • 4-6 layers minimum

Step 5: Reinforce the Mould

Large moulds can distort if insufficiently reinforced.

Add:

  • Fibreglass ribs
  • Timber stiffeners
  • Structural reinforcement sections

This is particularly important for production tooling where dimensional consistency is critical.

Step 6: Cure and Demould

Allow the mould to cure fully before removal.

Check Before Demoulding

  • No surface tackiness
  • Full rigidity
  • Edges trimmed and sanded


Demoulding Methods

  • Plastic wedges
  • Soft mallet
  • Compressed air (if air-hole method used)

Avoid using excessive force, which can damage both mould and plug.

Step 7: Finish the Mould

Before producing parts:

Finishing Process

  • Trim excess fibreglass
  • Polish the gelcoat
  • Apply 3 coats of wax
  • Apply release agent


Cure Time

Time
Recommended Use
24 Hours
Light Use
2 Weeks
Production Use

How to Make Parts from Your Finished Fibreglass Mould

Once your mould is complete:

  1. Clean using acetone.
  2. Apply mould release agent.
  3. Apply gelcoat.
  4. Allow gelcoat to cure.
  5. Apply fibreglass and resin.
  6. Consolidate with a roller.
  7. Cure fully.
  8. Trim and finish.

Most composite parts require at least three layers of fibreglass reinforcement.

Common Fibreglass Mould-Making Mistakes

Avoid these common issues:

Insufficient Wax Application

Can cause permanent bonding between mould and plug.

Air Entrapment

Creates weak spots and cosmetic defects.

Sharp Corners

Increase the likelihood of cracking and demoulding problems.

Rushing Cure Times

Premature demoulding can distort the mould.

Poor Surface Preparation

Results in defects being replicated across every future part.

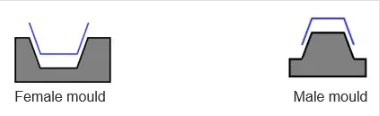
Female vs Male Moulds

Selecting the correct mould type is important.

Female Mould

Advantages:

  • Smooth exterior finish
  • Better cosmetic quality
  • Most common production method

Male Mould

Advantages:

  • Faster to build
  • Suitable for prototypes
  • Lower initial tooling costs

Frequently Asked Questions

What is the best material for making a fibreglass mould?

Fibreglass reinforced with polyester resin and tooling gelcoat is one of the most cost-effective and durable mould-making systems.

How many coats of mould release wax should I apply?

Generally 4-5 coats are recommended before producing a mould.

How thick should a fibreglass mould be?

Most moulds require 4-6 layers of fibreglass, depending on size and application.

How long should a fibreglass mould cure?

The mould may be usable after 24 hours, but allowing up to two weeks provides optimal stability and durability.

Can a fibreglass mould be reused?

Yes. Properly maintained moulds can produce hundreds of parts over their lifespan.

Mould Screenshot
Mould Screenshot
Male mould - female mould screenshot

Need Help Choosing Materials?

At Tricel Composites, we supply a complete range of:

  • Fibreglass reinforcements
  • Polyester resins
  • Gelcoats
  • Mould release waxes
  • Composite tooling products

Contact our technical team for expert advice on selecting the right products for your application.

Read More...