Choosing the Right GRP Roof Trim

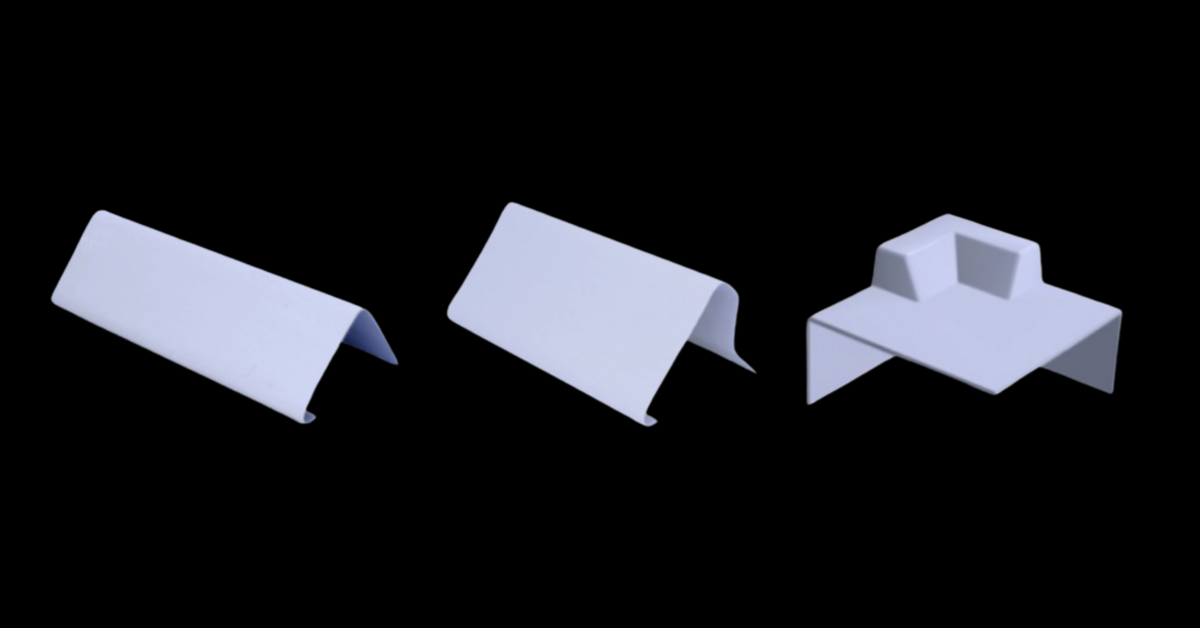
TriRoof GRP roof trim profiles

Quick answer: Choose a GRP roof trim by what the edge does. Use an A range drip trim (A170, A200 or A250) where water runs into a gutter. Use a B range raised edge trim (B230, B260 or B300) where water must be held on the roof. Where the roof meets a wall, use a D range wall fillet (D260 or D300) with a C range simulated lead flashing (C100 or C150) above it.


A GRP roof is only as good as its edges. The laminate itself is jointless and continuous, so the points where it stops (a gutter edge, an abutting wall, a ridge, a corner) are where water finds its way in. TriRoof GRP roof trims are pre-formed GRP profiles that terminate the laminate at each of those points and give it something rigid to bond to. They are part of the TriRoof GRP roofing system.

The range is organised by letter. Each letter describes a job, not a size, and each profile within a letter is a variation for a particular deck build-up or wall detail. This guide sets out what each range is for, the dimensions of every profile, which corner units it works with, and how it is fixed.

All extruded TriRoof profiles are supplied in 3 metre lengths as standard unless the product record states otherwise. Flat flashings come in 20 metre rolls. Every trim weighs 550 g/m², is UV stabilised, pre-pigmented, and fire retardant to BS476 Part 3. Trims can be laminated over their entire surface or finished with topcoat applied directly to the trim with one exception, noted under the C range.

KEY FACTS ABOUT TRIROOF GRP ROOF TRIMS

Specification
Value
Standard length (extruded profiles)
3 metres, unless the product record states otherwise
Flat flashings (F range)
20 metre rolls, in 300 mm, 600 mm and 900 mm widths
Weight
550 g/m²
Fire performance
Fire retardant to BS476 Part 3
Finish
UV stabilised and pre-pigmented
Topcoat
Can be laminated over or topcoated directly, except the C range, which must not be topcoated
Expansion joints
Required on roofs over 50 m²
Source
TriRoof Trim Brochure and Technical Specification Guide, IFS 1132503

THE TRIROOF ROOF TRIM RANGES AT A GLANCE

The TriRoof trim family has nine lettered ranges, each named for the job it does. Drip trims are the A range; the C range covers simulated lead flashings and the C1 to C6 corners.

Range
What it does
Profiles
A
Drip and fascia trims at the lowest edge, where water runs into the gutter
A170, A200, A250
B
Raised edge trims that contain water and stop run-off where it is not wanted
B230, B260, B300
C (100 / 150)
Simulated lead flashings at wall abutments
C100, C100MT, C100L, C100LMT, C150, C150MT, C150L
C (1 to 6)
Pre-formed corners and closures
C1, C2, C3, C4, C5, C6
D
Wall fillet trims at abutments, also providing expansion and ventilation
D260, D300
E
Simulated rolled lead joints and ridge rolls, both providing expansion
E35/40, E280
F
Flat flashing at pitched-to-flat intersections and complex details
F300, F600, F900
G
Flush expansion joint with an integral gutter
G180
S
Oversized soffit trim for concrete edges
S500
AT
Internal and external angle trims for upstands and step details
AT195 Int, AT195 Ext

A RANGE — DRIP AND FASCIA TRIMS

A range trims form the lowest roof edge where rainwater discharges into the gutter. The range includes A170, A200 and A250 profiles for different roof and fascia build-ups.

Use for: Gutter edges and fascia details where water needs to discharge clear of the roof into the gutter.

Profile
Girth
Depth
Use
A170
170 mm
65 mm
Where it is not possible to use the larger A200. Its drip matches the B230 raised edge
A200
200 mm
90 mm
The standard size drip trim. Compatible with C1, C2 and C4 corner trims.
A250
250 mm
140 mm
Warm roofs. The deep fascia covers the insulation and allows gutter penetration. Its drip matches the B300

How to fix an A range drip trim

  1. Fix two support battens to the perimeter of the roof, leaving space for the gutter to sit behind the trim. Set the outer batten 10 mm lower than the inner batten so the trim sits flush with the roof.
  2. Apply polyurethane adhesive to the batten in 30 mm beads at 300 mm centres.
  3. Rub the trim into place and nail it to the decking. Never nail through the front of the trim.

Tip: If the roof has only a minimal pitch, rainwater will tend to hold behind the trim. Take 2 mm off the deck with a planing machine so the trim lies flush with the board.

B RANGE — RAISED EDGE TRIMS

B range trims create a raised perimeter edge where water needs to be retained on the roof rather than discharged over the edge. Different profiles accommodate different deck build-ups and required edge heights.

Use for: Raised roof edges, including perimeter details where rainwater needs to be directed towards the intended drainage point.

Profile
Girth
Depth
Use
B230
230 mm
105 mm
The smallest raised edge trim, for containing and directing the flow of water. Drip matches the A170.
B260
260 mm
125 mm
The standard size. Compatible with C1, C2 and C4 corner trims.
B300
300 mm
180 mm
Deep fascia raised edge for warm roof configurations. Drip matches the A250.

HOW TO FIX A B RANGE RAISED EDGE TRIM

  1. Fix a single batten level with the top edge of the deck.
  2. Apply 30 mm beads of polyurethane adhesive to the batten every 300 mm.
  3. Rub the trim into place and nail through the top of the trim into the decking. Never nail through the front.

Tip: Where a ladder will regularly be leant against a B trim, reinforce it or it will deform. Either slot an extra section of trim inside it at that point, add an extra layer of GRP laminate finished with tissue for a smooth finish, or shape a wooden batten to fit into the ridge of the trim.

C RANGE — SIMULATED LEAD FLASHINGS

C range simulated lead flashings are used at wall abutments above the D range wall fillet. The range includes C100 and C150 profiles and their variants. The C range also includes pre-formed corners and closures C1 to C6 for specific roof details.

Use for: Simulated lead flashing at wall abutments, together with compatible pre-formed corners and closures.

Profile
Girth
Depth
Use
C100
100 mm
35 mm
Standard simulated lead flashing for wall abutments.
C100MT
100 mm
35 mm
As C100, with an integral self-securing moisture trap
C100L
100 mm
35 mm
Long leg, for deeper wall penetration
C100LMT
100 mm
35 mm
Long leg with an integral self-securing moisture trap
C150
150 mm
35 mm
Deeper vertical cover for taller upstands
C150MT
150 mm
35 mm
As C150, with an integral self-securing moisture trap
C150L
150 mm
35 mm
Long leg, for deeper wall penetration

C1 TO C6 — PRE-FORMED CORNERS AND CLOSURES

Profile
Type / compatibility
C1
External corner for use with compatible A, B and C range trims
C2
Internal corner for use with compatible A, B and C range trims
C3
Corner detail for C range simulated lead flashing
C4
Corner detail for compatible edge and flashing profiles
C5
Closure for specific C range details
C6
Closure for specific C range details

HOW TO FIX A C RANGE SIMULATED LEAD FLASHING

  1. Chase the flashing into the brickwork or masonry joint above the D range wall fillet.
  2. Ensure the C range flashing overlaps the wall fillet below.
  3. Fix and seal the flashing in accordance with the specified roof detail.

HOW TO FIX A CORNER OR CLOSURE

  1. Position the pre-formed corner or closure with the compatible trim.
  2. Overlap the adjoining trim by at least 50 mm.
  3. Apply polyurethane adhesive to the inside of the overlapping trim and press the components firmly together so the adhesive seals the joint.

D RANGE — WALL FILLET TRIMS

D range wall fillet trims are used where a GRP roof meets an abutting wall. The D260 and D300 form the transition between the horizontal roof deck and the vertical wall and are used with C range simulated lead flashing above.

Use for: Roof-to-wall abutments where a wall fillet is required beneath the C range flashing.

Profile
Girth
Fillet flanges
Upstand height
D260
260 mm
135 mm and 70 mm
120 mm
D300
260 mm
175 mm and 70 mm
120 mm

HOW TO FIX A D RANGE WALL FILLET

  1. Place the trim against the vertical face and push down diagonally into the corner until it fits snugly.
  2. Where two lengths of D trim meet, bond the joint with a strip of polyurethane adhesive and bandage the joint together.
  3. Leave a 25 mm gap to allow for expansion of the decking.
  4. Nail the D trim to the deck. It remains unattached behind the C trim above it.

Compatibility: D260 is compatible with the C2 fillet-to-trim corner and the C3 internal and external fillet corners, which avoid mitring in situ.

E35/40 — SIMULATED ROLLED LEAD JOINT

E range trims form simulated rolled lead joints and ridge details within a GRP roof. The range includes E35/40 and E280 profiles, both of which provide for expansion.

Use for: Rolled joints and ridge details where provision for expansion is required.

Specification
Value
Girth
130 mm
Flanges
20 mm
Height
40 mm
Roll width
35 mm
Compatible closure
C6

How to fix E35/40

  1. Nail to the deck at 300 mm centres.
  2. Bandage the joins and nail penetrations.
  3. Lay the laminate over the trim and consolidate it well.

E280 — RAISED RIDGE ROLL AND EXPANSION JOINT

Specification
Value
Girth
280 mm
Flanges
90 mm
Height
50 mm
Compatible closure
C5

How to fix E280

  1. Cut an adequate gap in the deck where necessary.
  2. Nail the trim to each end of the decking at 300 mm centres.
  3. Bandage the join over the nails.
  4. Laminate over the trim.

The E280 creates expansion joints on roofs over 50 m² and forms rolls on ridge details.

F RANGE — FLAT FLASHING

 F range trims provide flat GRP flashing for pitched-to-flat roof intersections and other complex roofing details. The range includes F300, F600 and F900 flat flashings.

Use for: Pitched-to-flat roof intersections, dormers and other details requiring flat GRP flashing.

Profile
Width
Roll Length
F300
300 mm
20 mm
F600
600 mm
20 mm
F900
900 mm
20 mm

HOW TO FIX F RANGE FLAT FLASHING

  1. Nail or staple the trim to the deck around its edges.
  2. Bandage over any joins or nail penetrations.
  3. Do not laminate completely over the F trim, as it will crack.
  4. Where the trim is being used as an expansion facility, fix it to the deck along the bottom edge only.
  5. Any unlaminated trim can be topcoated with the rest of the roof.

G RANGE — FLUSH EXPANSION JOINT

G180 forms a flush expansion joint with an integral gutter. It provides for movement within the GRP roof while also allowing water to drain through the joint.

Use for: Flush expansion joints where the detail also needs to provide drainage.

Specification
Value
Girth
180 mm
Flanges
30 mm
Gutter width
80 mm
Gutter depth
15 mm

HOW TO FIX G180

  1. Cut a suitable gap in the decking where the expansion joint is required.
  2. Position the G180 centrally over the joint.
  3. Nail the trim to the decking at 300 mm centres on each side.
  4. Bandage over the nail penetrations and joints.
  5. Laminate over the flanges while leaving the gutter section free to accommodate movement and drainage.

HOW TO FIX G180

  1. Cut a suitable gap in the decking where the expansion joint is required.
  2. Position the G180 centrally over the joint.
  3. Nail the trim to the decking at 300 mm centres on each side.
  4. Bandage over the nail penetrations and joints.
  5. Laminate over the flanges while leaving the gutter section free to accommodate movement and drainage.

AT RANGE — INTERNAL AND EXTERNAL ANGLE TRIMS

The AT195 range is used wherever the laminate has to continue perpendicular to another laminated surface, including upstands, gutter floors, step details and cover flashings. It is available as AT195 Int and AT195 Ext.

Use for: Internal and external angles, upstands, gutter floors, step details and cover flashings.

Profile
Girth
Flanges Widths
Use
AT195 Int
195 mm
95 mm / 95 mm
Internal angle trim for upstands, gutter floors, step details and other internal angles
AT195 Ext
195 mm
95 mm / 95 mm
External angle trim for external corners, upstands and cover-flashing details

HOW TO FIX AT195

  1. Position the AT195 trim at the required internal or external angle.
  2. Fix the trim securely to the substrate.
  3. Bandage over the joints and fixing points.
  4. Laminate over the trim so that the GRP laminate continues across the angle.

S RANGE — SOFFIT TRIM

The S500 is an oversized fascia trim that fully encapsulates a concrete roof edge or a similar detail requiring an oversized soffit trim.

Use for: Concrete roof edges and similar details requiring an oversized soffit trim

Specification
Value
Girth
450 mm
Depth
225 mm
Application
Concrete roof edges and similar details requiring an oversized soffit trim
Function
Fully encapsulates the roof edge

HOW TO FIX S500

  1. Attach a support batten to the wall beneath the structure.
  2. Nail the trim to the decking at 300 mm centres.
  3. Nail the underside of the trim to the support batten.
  4. Bandage the join where the nails penetrate the trim and the decking.
  5. Apply the laminate so that it overlaps the edge of the bandage, but does not extend onto the fascia of the trim.

GRP VALLEY TRIMS AND BONDING GUTTERS

TriRoof GRP valley trims and bonding gutters drain the valley junctions of pitched roofs and are dry fixed, with the bonding gutters supplied as a separate range. Both are made in glass reinforced plastic and are suitable for domestic and commercial roofs.

Stock code
Product code
Product
Central rib height
Overall width
107084
TDFV55H3M
Dry fix valley trim
55 mm
380 mm
107082
TDFV80H3M
Dry fix valley trim
80 mm
380 mm
107083
TDFV100H3M
Dry fix valley trim
102 mm
380 mm
107085
TDBG70H3M
Dry fix bonding gutter
70 mm
240 mm
107086
TDBG100H3M
Dry fix bonding gutter
100 mm
240 mm

VALLEY TRIM AND BONDING GUTTER SPECIFICATION

Specification
Value
Material
Unsaturated polyester resin with alkali-free reinforced glass fibre mat
Thickness
1.2 mm
Density
1.4 g/cm³
Weight
1680 g/m²
Colour
Grey (RAL 7024)
Surface
Smooth on both sides
Length
3 metres as standard
Life span
15 to 20 years

The data sheet states that the trims resist UV, extreme temperatures and harsh weather, and are lighter and easier to handle than traditional metal valley trims. Full drawings are in the GRP Valley Trims data sheet on our technical data sheets page.

WHICH TRIM SIZE FOR A COLD ROOF OR A WARM ROOF?

Warm roofs usually need the larger A250 and B300 profiles, because the insulation sits above the joists and makes the roof edge thicker. A GRP roof can be configured as either a cold roof or a warm roof, and the choice decides which trim size is needed.

For a warm roof, a sub-deck is fixed to the joists at 300 mm centres. A vapour check and insulation sheet are laid over the top (insulation sheets can also be bought with a vapour check bonded to one side), and the decking is then fixed on top as normal. Screws fixing the boards to the joists must penetrate through the insulation and into the joists to the same depth as standard fixings. Every layer must be pressed firmly together with no gaps. The GRP is then laminated over the top as usual.

Note: The trim guide gives this build-up as achieving a U value of 0.20 to comply with the Part L regulations of April 2006: 12 mm ply sub-deck, 100 mm of Kingspan TR26 or equivalent, 18 mm tongue and groove OSB3 board, then the GRP laminate. Check current Part L requirements before specifying, as this figure dates from the 2006 regulations.

DO GRP ROOFS OVER 50 M² NEED AN EXPANSION JOINT?

Yes. GRP roofs over 50 m² need an expansion detail, because a large area of rigid laminate bonded to a timber deck that moves will eventually crack. Two profiles do this job: the G180, which sits flush and doubles as an integral gutter, and the E280, which stands proud as a ridge roll. The D260 and D300 fillets also contribute perimeter expansion and ventilation at abutments, and the E35/40 and F range provide expansion where they are used.

The layout of expansion joints on a particular roof is a design decision, not a rule of thumb. Speak to our technical support team before setting one out.

Quick Comparison Table

Trim Type
Main Function
Best Use Case
A Range
Forms drip and fascia edge
Gutter edges and fascia details
B Range
Forms a raised perimeter edge
Raised roof edges and perimeter details
C Range
Provides simulated lead flashing
Wall abutments above D range wall fillets
D Range
Forms a wall fillet transition
Roof-to-wall abutments
E Range
Forms rolled joints and ridge details
Expansion joints and ridge details
F Range
Provides flat GRP flashing
Pitched-to-flat intersections, dormers and complex details
G Range
Forms a flush expansion joint with drainage
Flush expansion joints requiring drainage
AT Range
Forms internal and external angle details
Upstands, gutter floors, step details and cover flashings
S Range
Forms an oversized soffit/fascia detail
Concrete roof edges and oversized soffit details

How to Choose the Right Roof Trim

Work around the perimeter of the roof and match each edge to what it has to do.

If the edge…
You need
Drains rainwater into a gutter
A range drip trim
Needs a raised perimeter to retain/direct water
B range raised edge trim
Meets an abutting wall
D range wall fillet with compatible C range flashing
Needs simulated lead flashing
C range
Turns a corner where the roof meets a wall
C2, or C3 for a D260 fillet
Needs a rolled joint
E35/40
Needs a raised expansion joint or ridge roll
E280
Needs a flush expansion joint with drainage
G180
Needs flat flashing at a pitched-to-flat junction
F300, F600 or F900
Needs an internal or external angle detail
AT195 Int or AT195 Ext
Has an oversized concrete fascia/soffit edge
S500
Is a pitched-roof valley or bonding-gutter detail
GRP valley trim or bonding gutter
You are not sure

GRP ROOF TRIM FAQS

Which trim do I use at a gutter edge?

An A range drip trim: A170, A200 or A250. A200 is the standard size. Use A170 where there is not enough room for the A200, and A250 on a warm roof where the fascia has to cover the insulation. The C range is for wall flashings, not gutter edges.

WHAT IS THE DIFFERENCE BETWEEN A DRIP TRIM AND A RAISED EDGE TRIM?

A drip trim (A range) sits at the lowest edge and throws water clear of the fascia into the gutter. A raised edge trim (B range) forms an upstand that holds water on the roof and directs it to where it should drain. The A170 drip matches the B230 and the A250 drip matches the B300, and the standard A200 and B260 share the C1, C2 and C4 corners, so the two ranges work together on the same roof.

WHAT TRIM DO I USE WHERE A FLAT ROOF MEETS A WALL?

A D range wall fillet (D260 or D300) at the base of the wall, with a C range simulated lead flashing (C100 or C150) chased into the masonry above it and overlapping the fillet. Use a C2 or C3 corner where the junction turns a corner.

WHAT LENGTH DO TRIROOF TRIMS COME IN?

All extruded profiles are supplied in 3 metre lengths as standard unless the product record states otherwise. Flat flashings in the F range come in 20 metre rolls, in 300 mm, 600 mm and 900 mm widths.

HOW DO I JOIN TWO LENGTHS OF TRIM?

Apply a strip of polyurethane adhesive along the inside of the overlapping trim and rub the two into place. For closures, overlap by at least 50 mm and press firmly so the adhesive seals the gap.

CAN TRIMS BE TOPCOATED?

GRP edge trims can be laminated over their entire surface or finished with topcoat applied directly to the trim. The exception is the C range of simulated lead flashings, which must not be topcoated. Their dark grey finish is intended to be left exposed.

DO I NEED AN EXPANSION JOINT?

On roofs over 50 m², yes. Use a G180 for a flush joint that also drains, or an E280 where a raised roll suits the detail. The layout should be confirmed with the technical team rather than assumed.

SPECIFYING GRP ROOF TRIMS WITH CONFIDENCE

Getting the trim right is the difference between a roof that lasts and a callback. If an edge detail is not covered here, or a roof has a junction that does not fit any of the standard profiles, our technical team will specify it with you before you order. Installers can also train with us on the TriRoof GRP training course.

NEED HELP SPECIFYING YOUR GRP ROOF TRIMS?

Send us your roof detail or drawing and our technical team will confirm the right profile before you order.

Sources: TriRoof Trim Brochure and Technical Specification Guide, IFS 1132503; TriRoof GRP Valley Trims Technical Data Sheet, Rev.1, 17 February 2025. All dimensions, compatibilities and fixing instructions on this page are taken from those documents, available on our technical data sheets page.

TRIROOF ARTICLES

Liquid Roofing Systems Banner
Construction & Building Solutions
Roofing Resin Subcategories Explained

Roofing resins like Original GRP, HPX, MultiFlex, Polyurethane, and Acrylic offer unique benefits for residential and commercial properties. Learn about the advantages, applications, and features of each resin type to choose the best option for your roofing needs.

Read More »